* user detailservice / password encoder /authorization provider
스프링 시큐리티에서 애플리케이션 보안을 구성하기 위해 크게 두 가지 영역을 가지고 있다.
1. 인증 (Authentication) = 해당 사용자가 본인이 맞는지 확인 (ex. 로그인 -> 로그인을 하게 되면 JWT나 Session을 통해
인증 유지)
2. 권한 (Authorization) = 해당 사용자가 자원을 접근할 권한이 있는지를 확인
대부분의 시스템에서는 회원을 관리하고 있고, 그에 따른 인증과 권한에 대한 처리가 필요하다.
기본적으로 스프링 시큐리티는 인증 절차를 거친 후에 권한 과정을 거침으로써 해당 리소스에 접근 권한이 있는지 확인한다.
스프링 시큐리티에서는 이러한 인증과 권한을 위해 Credential 기반의 인증 방식을 사용한다.
그렇다면 Credential은 무엇일까? 쉽게 생각하면 사용자명(Principle), 비밀번호(Credential)로 인증한다 생각하면 된다.
Spring Security는 인증과 권한에 대한 부분을 Filter 흐름에 따라 처리하고 있다.
그렇다면 Filter 는 또 무엇일까?

Filter는 Dispatcher Servlet으로 가기전에 적용된다.
그렇기에 요청이 왔을 때 DIspatcher Servlet으로 전달되기 전에 헤더를 검사해서 인증 토큰의 유무나 적절한지 등을 검사할 수 있다.
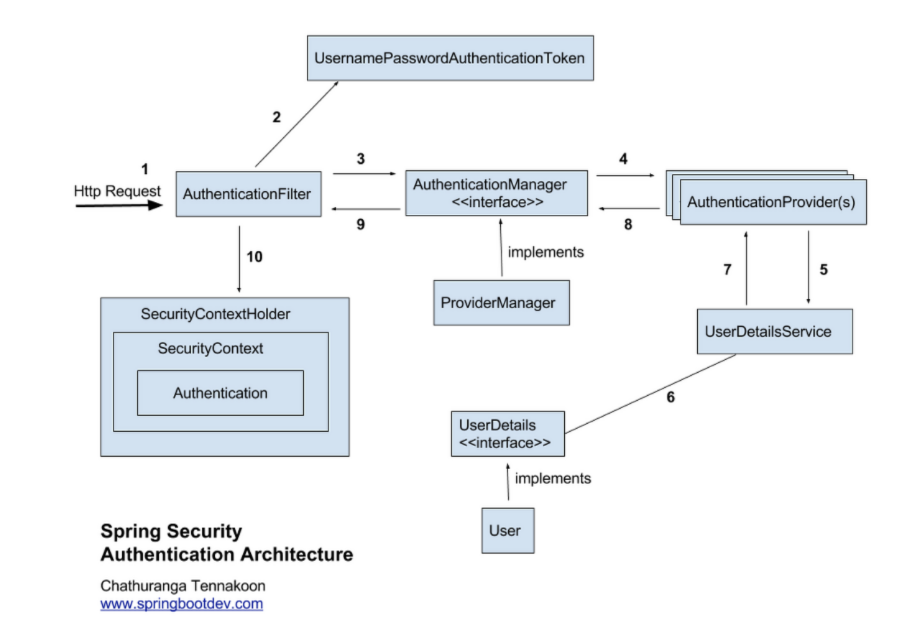
그렇다면 이제 인증관련 Architecture 사진을 보며 이해해보자

1. 로그인 요청(request)
사용자가 로그인을 하기 위해 아이디와 비밀번호를 입력해서 로그인 요청을 했다.
2. UserPasswordAuthenticationToken 발급
전송이 오면 AuthentificationFilter로 요청이 오고 해당 아이디와 비밀번호를 기반으로 UserPasswordAuthenticationToken을 발급해줘야한다.
AuthentificationFilter를 구현하면 이렇다.
@Log4j
public class CustomAuthenticationFilter extends UsernamePasswordAuthenticationFilter {

    public CustomAuthenticationFilter(AuthenticationManager authenticationManager) {
        super.setAuthenticationManager(authenticationManager);
    }

    @Override
    public Authentication attemptAuthentication(HttpServletRequest request, HttpServletResponse response) throws AuthenticationException {
        UsernamePasswordAuthenticationToken authRequest = new UsernamePasswordAuthenticationToken(request.getParameter("userEmail"), request.getParameter("userPw"));
        setDetails(request, authRequest);
        return this.getAuthenticationManager().authenticate(authRequest);
    }

}3. UsernamePasswordToken을 Authentication Manager에게 전달
Authentication Filter는 생성한 UsernamePasswordToken을 AuthenticationManager에게 전달한다.
AuthenticationManager는 실제로 인증을 처리할 여러 개의 AuthenticationProvider를 가지고 있다.
4. UsernamePasswordToken을 Authentication Provider에게 전달
전달받아진 UsernamePasswordToken은 AuthenticationProvider들에게 순차적으로 인증 과정을 처리되어진다.
Spring Security에서는 Username으로 DB에서 데이터를 조회한 후, 비밀번호의 일치 여부를 검사하는 방식으로 구동된다.
그렇기에 우선 먼저 토큰으로부터 아이디를 조회해야한다.
public class CustomAuthenticationProvider implements AuthenticationProvider {

    @Override
    public Authentication authenticate(Authentication authentication) throws AuthenticationException {
        UsernamePasswordAuthenticationToken token = (UsernamePasswordAuthenticationToken) authentication;
        // AuthenticaionFilter에서 생성된 토큰으로부터 아이디와 비밀번호를 조회함
        String userEmail = token.getName();

    }
}5. UserDetailsService로 조회할 아이디를 전달
AuthenticationProvider에서 아이디를 조회했다면, UserDetailsService로부터 아이디를 기반으로 데이터를 조회해야 한다.
6. 아이디를 기반으로 DB에서 데이터 조회
7. 아이디를 기반으로 조회한 결과를 반환
@RequiredArgsConstructor
@Service
public class UserDetailsServiceImpl implements UserDetailsService {

    private final UserRepository userRepository;

    @Override
    public UserDetailsVO loadUserByUsername(String userEmail) {
        return userRepository.findByUserEmail(userEmail).map(u -> new UserDetailsVO(u, Collections.singleton(new SimpleGrantedAuthority(u.getRole().getValue())))).orElseThrow(() -> new UserNotFoundException(userEmail));
    }

}현재 UserRepository에서 조회한 결과를 Optional로 반환했다.
8. 인증 처리 후 인증된 토큰을 Authentication Manager에게 반환
AuthenticationProvider에서 UserDetailsService를 통해 조회한 정보와 입력받은 비밀번호가 일치하는지 확인하여,
일치하다면 인증된 토큰을 생성하여 반환해주어야 한다.
DB에서 저장된 사용자 비밀번호는 암호화가 되어있으므로, 입력으로 들어온 비밀번호는 PasswordEncoder를 통해 암호화해서 DB에서 조회한 사용자의 비밀번호와 매칭되는지 확인해줘야한다.
코드를 보면 이런 식이겠다.
public Authentication authenticate(Authentication authentication) throws AuthenticationException {
        UsernamePasswordAuthenticationToken token = (UsernamePasswordAuthenticationToken) authentication;
        // AuthenticaionFilter에서 생성된 토큰으로부터 아이디와 비밀번호를 조회함
        String userEmail = token.getName();
        String userPw = (String) token.getCredentials();
        // UserDetailsService를 통해 DB에서 아이디로 사용자 조회
        UserDetailsVO userDetailsVO = (UserDetailsVO) userDetailsService.loadUserByUsername(userEmail);

        if (!passwordEncoder.matches(userPw, userDetailsVO.getPassword())) {
            throw new BadCredentialsException(userDetailsVO.getUsername() + "Invalid password");
        }

        return new UsernamePasswordAuthenticationToken(userDetailsVO, userPw, userDetailsVO.getAuthorities());
}9. 인증된 토큰을 Authentication Filter에게 전달
AuthenticationProvider에서 인증이 완료된 UsernamePasswordAuthenticationToken을 AuthenticationFilter로 반환하고,
AuthenticationFilter는 LoginSuccessHandler로 전달한다.
10. 인증된 토큰을 SecurityContextHolder에 저장

사진을 보며 간략하게 요약해보자
1. 사용자가 아이디 비밀번호로 Request 요청을 보냄
2. AuthenticationFilter에서 UsernamePasswordAuthenticationToken을 생성해서 Authentication Manager에게 전달
3. AuthenticationManager는 등록된 AuthenticationProvider들을 조회해서 인증을 요구함(이 Provider들은 List에 있으므로 순차적 탐색)
4. AuthenticationProvider는 UserDetailsService를 통해 입력받은 아이디에 대한 사용자 정보를 DB에서 조회한다.
5. 입력받은 비밀번호를 암호화해 이를 DB의 비밀번호와 매칭해 인증이 성공한다면 UsernameAuthenticationToken을 생성해서 AuthenticationManger에게 반환한다.
6. AuthenticationManager는 UsernameAuthenticationToken을 AuthenticationFilter로 전달한다.
7. AuthenticationFilter는 전달받은 UsernameAuthenticationToken을 LoginSuccessHandler로 전송하고, SecurityContextHolder에 저장한다.
출처 : https://mangkyu.tistory.com/77
[SpringBoot] Spring Security 처리 과정 및 구현 예제
이번에는 Spring Security가 어떤 과정으로 Authentication 처리를 하는지, 그리고 실제로 어떻게 구현하는지 알아보도록 하자. 1. Spring Security 처리 과정 Spring Security 아키텍쳐는 위와 같으며 각각의 처리
mangkyu.tistory.com
https://webfirewood.tistory.com/115
SPRING SECURITY + JWT 회원가입, 로그인 기능 구현
이전에 서블릿 보안과 관련된 포스트(링크)를 작성했던 적이 있습니다. 서블릿 기반의 웹 애플리케이션에서 인증과 인가 과정을 간단하게 설명했습니다. 스프링에서는 마찬가지로 이런 인증과
webfirewood.tistory.com
https://dev-coco.tistory.com/174
Spring Security의 구조(Architecture) 및 처리 과정 알아보기
시작하기 앞서 스프링 시큐리티에서 어플리케이션 보안을 구성하는 두 가지 영역에 대해 간단히 알아보자. 인증(Authentication)과 인가(Authorization) 대부분의 시스템에서는 회원을 관리하고 있고,
dev-coco.tistory.com
'스프링 정리' 카테고리의 다른 글
| 테스트코드에서의 @Transactional (0) | 2023.10.30 |
|---|---|
| Spring Batch - @PersistJobDataAfterExecution (0) | 2023.04.04 |
| Spring Security & JWT(Json Web Token) 활용 예제 (0) | 2023.03.28 |
| Spring Batch & Quartz 활용해보기 (0) | 2023.03.24 |
| Spring Batch 간단하게 활용해보기(스프링 배치 5.0) (2) | 2023.03.24 |
